Firebase Google Authentication

Hello everyone, In this blog, we're going to learn how we can authenticate users using Firebase and Google. You can also see part-2 and part-3 of this series where we see how you can use Facebook and GitHub authentication as well.
What we'll learn
How we can use the useContext API to authenticate our user?
How to protect and navigate through our routes?
How to use Firebase for authentication?
Dependencies
We'll use Vite to build our React app, Vite is extremely fast and an alternative to create-react-app.
npm create vite@latest
Next, install some dependencies that we'll need for our authentication purpose.
npm install --save firebase dotenv react-router-dom
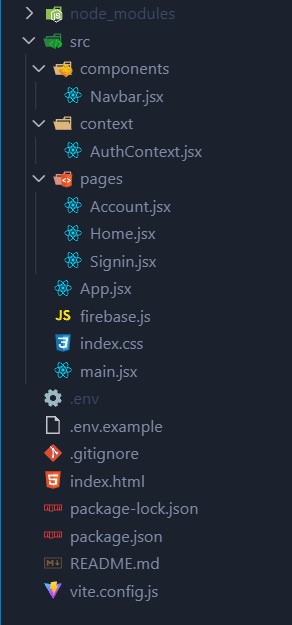
Folder Structure📂
Get Started 🚀
Firebase settings
Go to your firebase console.
Create a new Project.
Now create a web app and copy your firebase configuration.
Now go to Build > Authentication and press
get started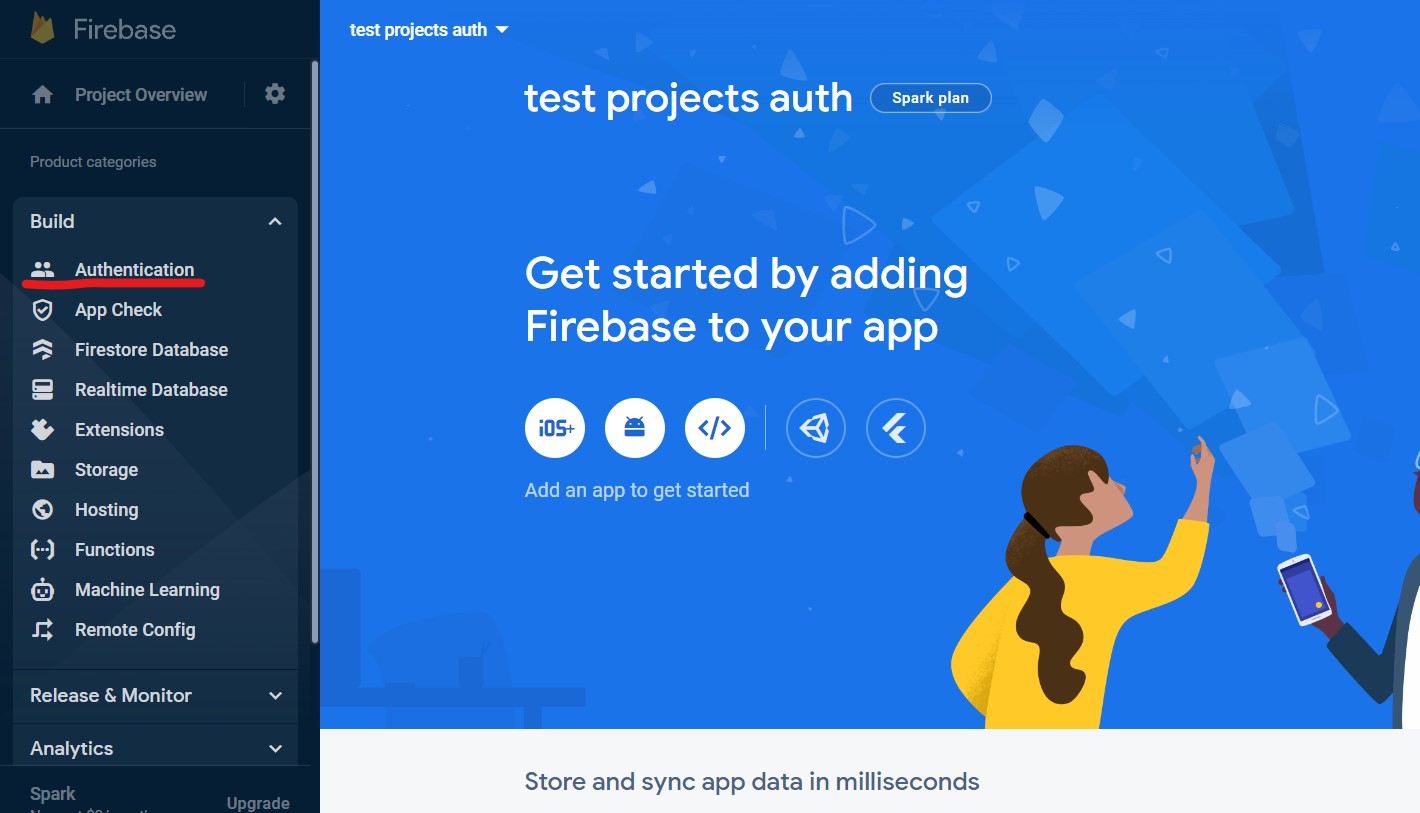
You can see multiple providers here that you can incorporate into your application, click on Google.
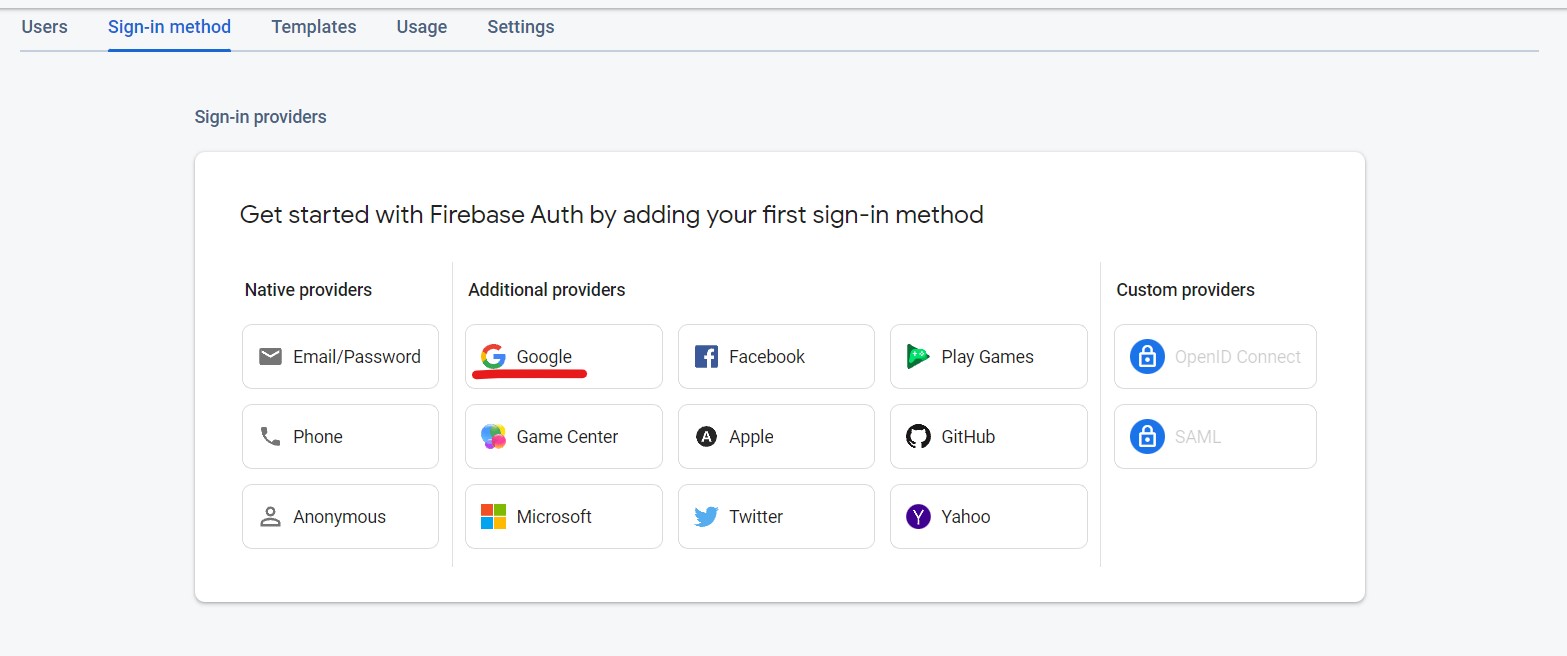
Add a Project support email and continue.
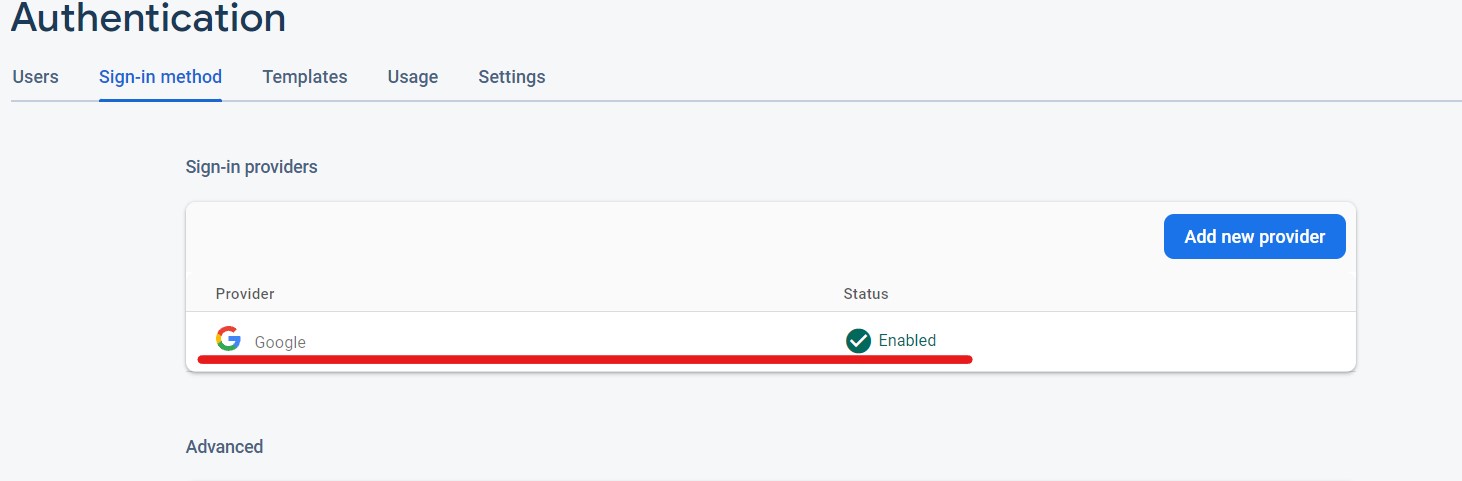
You'll see something like this, which means you have successfully added google auth to your firebase project.
firebase.js file
Create a .env file and add your keys like this that you've copied from the firebase.
VITE_API_KEY=
VITE_AUTH_DOMAIN=
VITE_PROJECT_ID=
VITE_STORAGE_BUCKET=
VITE_MESSENGING_SENDER_ID=
VITE_APP_ID=
Now create a firebase.js file and write the following code.
import { initializeApp } from "firebase/app";
import { getAuth } from "firebase/auth";

const firebaseConfig = {
    apiKey: import.meta.env.VITE_API_KEY,
    authDomain: import.meta.env.VITE_AUTH_DOMAIN,
    projectId: import.meta.env.VITE_PROJECT_ID,
    storageBucket: import.meta.env.VITE_STORAGE_BUCKET,
    messagingSenderId: import.meta.env.VITE_MESSENGING_SENDER_ID,
    appId: import.meta.env.VITE_APP_ID,
};

const app = initializeApp(firebaseConfig);
export const auth = getAuth(app);
Home Page
Create a simple home page, so that we can track our login status, we'll protect this home page. If the user is not logged in we'll redirect the user to the signin page.
import React from "react";

const Home = () => {
    return (
        <div className="home">
            <h1>Home Page</h1>
        </div>
    );
};

export default Home;
Auth Context
We'll use the useContext API to implement our User Authentication. Context API allows us to share our data without passing it down in the DOM tree.
import { useContext, createContext, useEffect, useState } from "react";
import {
    GoogleAuthProvider,
    signInWithPopup,
    signOut,
    onAuthStateChanged,
} from "firebase/auth";
import { auth } from "../firebase";

// create a context named AuthContext
const AuthContext = createContext();

export const AuthContexProvider = ({ children }) => {
    const [user, setUser] = useState({});

    const googleSignIn = () => {
        // GoogleAuthProvider is a firebase method that'll help us to login using google without writing everything by ourselves.
        const provider = new GoogleAuthProvider();
        signInWithPopup(auth, provider);
    };

    const logOut = () => {
        // signOut is also a firebase method that'll logout the current user.
        signOut(auth);
    };

    // using this we'll know whether our user is loggedIn or not.
    useEffect(() => {
        // we'll modify our User state whenever user login or logout.
        const unsub = onAuthStateChanged(auth, (currentUser) => {
            setUser(currentUser);
        });
        return () => {
            unsub();
        };
    }, []);

    return (
        <AuthContext.Provider value={{ googleSignIn, logOut, user }} >
            {children}
        </AuthContext.Provider>
    );
};

export const UserAuth = () => {
    return useContext(AuthContext);
};
main.jsx
Now, wrap your application with AuthContextProvider and BrowserRouter to enable authentication and routing throughout your application.
import React from "react";
import ReactDOM from "react-dom/client";
import App from "./App";
import "./index.css";
import { BrowserRouter } from "react-router-dom";
import { AuthContexProvider } from "./context/AuthContext";

ReactDOM.createRoot(document.getElementById("root")).render(
    <React.StrictMode>
        <AuthContexProvider>
            <BrowserRouter>
                <App />
            </BrowserRouter>
        </AuthContexProvider>
    </React.StrictMode>
);
Navbar
Now create a simple navbar like below.

import React from "react";
import { Link } from "react-router-dom";
import { UserAuth } from "../context/AuthContext";

const Navbar = () => {
    // we'll get user(if logged in) and logOut(to logOut the current user if logged in) from our context.
    const { user, logOut } = UserAuth();

    // This will signout our current user.
    const handleSignOut = async () => {
        try {
            await logOut();
        } catch (err) {
            console.log(err);
        }
    };

    // To login to our app.
    const handleGoogleSignin = async () => {
        try {
            await googleSignIn();
        } catch (error) {
            console.log(error);
        }
    };

    return (
        <div className="navbar">
            <h2>Firebase authentication</h2>
            {user ? (
                <button onClick={handleSignOut}>Sign out</button>
            ) : (
                <button onClick={handleGoogleSignin}>Sign in</button>
            )}
        </div>
    );
};

export default Navbar;
Signin page
Simple signin page with a button to login the user.
import React, { useEffect } from "react";
import { UserAuth } from "../context/AuthContext";
import { useNavigate } from "react-router-dom";

const Signin = () => {
    const { googleSignIn, user } = UserAuth();
    const nav = useNavigate(); // to navigate through our routes

    const handleGoogleSignin = async () => {
        try {
            await googleSignIn();
        } catch (error) {
            console.log(error);
        }
    };

    // If user is already logged in the navigate to account page.
    useEffect(() => {
        if (user !== null) {
            nav("/account");
        }
    }, [user]);

    return (
        <div className="signin">
            <button onClick={handleGoogleSignin}>Sign in with Google</button>
        </div>
    );
};

export default Signin;
Account Page
This page will display the user's information if the user is logged in otherwise it'll be a protected route that the user won't be abel to access without logging in.
import React from "react";
import { UserAuth } from "../context/AuthContext";

const Account = () => {
    const { user, logOut } = UserAuth(); // get user info and logout from context api.

    const handleSignOut = async () => {
        try {
            await logOut();
        } catch (err) {
            console.log(err);
        }
    };

    return (
        <div className="account">
            <h2>Account</h2>
            <h3>Welcome, {user?.displayName}!</h3>
            <button onClick={handleSignOut}>Logout</button>
        </div>
    );
};

export default Account;
App.jsx
import Signin from "./pages/Signin";
import Account from "./pages/Account";
import Home from "./pages/Home";
import { Route, Routes } from "react-router-dom";
import { UserAuth } from "./context/AuthContext.jsx";
import Navbar from "./components/Navbar";

function App() {
    const { user } = UserAuth(); // get user info.

    return (
        <div className="app">
            <Navbar />
            <Routes>
                <Route path="/" element={user ? <Home /> : <Signin />} />
                <Route path="/signin" element={<Signin />} />
                <Route
                    path="/account"
                    element={user ? <Account /> : <Signin />}
                />
            </Routes>
        </div>
    );
}

export default App;
CSS
Didn't changed much to the index.css file. Just added some basic styling to center our info, etc. You can copy the following code.
:root {
    font-family: Inter, system-ui, Avenir, Helvetica, Arial, sans-serif;
    line-height: 1.5;
    font-weight: 400;

    color-scheme: light dark;
    color: rgba(255, 255, 255, 0.87);
    background-color: #242424;
}

* {
    margin: 0;
    box-sizing: border-box;
}

app {
    margin: 0;
}

button {
    border-radius: 8px;
    border: 1px solid transparent;
    padding: 0.8em 1.2em;
    font-size: 1em;
    background-color: #1a1a1a;
    cursor: pointer;
    transition: border-color 0.25s;
}
button:hover {
    border-color: #646cff;
}
button:focus,
button:focus-visible {
    outline: 4px auto -webkit-focus-ring-color;
}

.home {
    text-align: center;
}

.signin {
    display: flex;
    flex-direction: column;
    align-items: center;
}

.signin button {
    margin: 5px;
}

.navbar {
    display: flex;
    justify-content: space-between;
    margin: 10px;
    background: #3d3c3c;
    padding: 10px;
    border-radius: 10px;
}

.account {
    text-align: center;
    margin-top: 50px;
}

.account h2 {
    margin-bottom: 20px;
}

.account button {
    margin-top: 20px;
}
Conclusion
In this article, we saw how we log in through Firebase and Google authentication and use the useContext API to share our data without passing it through the DOM tree and manage our routes and protect them. You can also learn about authentication using Facebook and GitHub in part-2 and part-3.
I hope that this was helpful to you, drop a like, comment and follow for more such blogs in the future. Next will be authentication using Facebook and GitHub.
Thank You :)


